Connect:Pidgin
Connecting with Pidgin
This guide will tell you how to connect to our bouncers using the Pidgin Messaging Client which is available at https://pidgin.im/install/. This client can also be downloaded on most variations of linux using the following command:
apt-get install pidgin
For the purposes of this guide, we have used Pidgin 2.12.0
Configuration
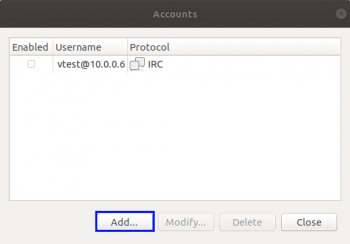
Pidgin needs to be configured to connect to our bouncer, so to do this we need to bring up the "Manage Accounts" window. If this hasn't appeared automatically when starting Pidgin, navigate to "Accounts -> Manage Accounts". You should be presented with a window like this:
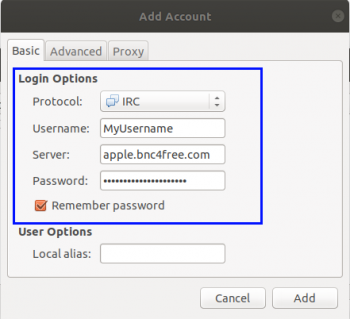
Click the add button and you should now be presented with a window that looks like the below:
The options in this window need to be configured/changed as follows:
| Option | Description | Value / Recommended Value |
|---|---|---|
| Protocol | Pidgin can be used for other protocols such as AIM, ICQ etc.. This needs to be set to IRC for our bouncers. | IRC |
| Username | This must be the username that you use to authenticate to your bouncer
Alternatively if your account has multiple networks, this must be the username and network name you wish to connect to on your account (i.e MyUsername/Network) |
MyUsername |
| Server | The server that your account has been added to (i.e apple.bnc4free.com) | <server>.bnc4free.com |
| Password | This must be the username and password you use to authenticate to your bouncer
Alternatively if your account has multiple networks, this must be the username, password and network name you wish to connect to on your account |
MyUsername:MyPassword |
| Remember Password | This option should be checked as Pidgin will forget the password and authentication will fail after the first connect attempt if it is not checked | Checked |
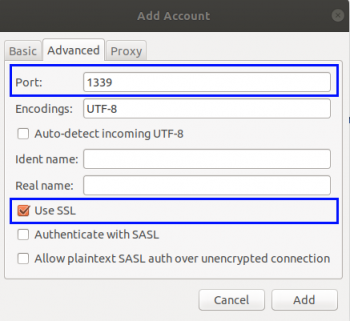
Next click on the "Advanced" tab which will bring up something like this
The options in this tab need to be configured/changed as follows:
| Option | Description | Value / Recommended Value |
|---|---|---|
| Port | This needs to be the port used to connect to the bouncer (1337 for Non-SSL / +1339 for SSL) | 1339 |
| Use SSL | This needs to checked if port +1339 (SSL) is being used | Checked |
Once completed, press the 'Add' button.
Connecting
Once you have added the Bouncer to pidgin, you will be automatically connected to your bouncer. Should you wish to disconnect from the bouncer, you will need to navigate to "Accounts " drop down menu and disable the account. This can also be achieved by selecting "Manage Accounts" and unticking the enabled checkbox in the list


