Connect:eMule
Connecting with eMule
This guide will tell you how to connect to our bouncers using the IRC feature of the eMule P2P client which is available at https://emule-project.net/. It should be noted that the IRC feature of eMule is very limited and may not function correctly, nevertheless it is possible to use our bouncers with it.
For the purposes of this guide, we have used eMule v0.50a
Configuration
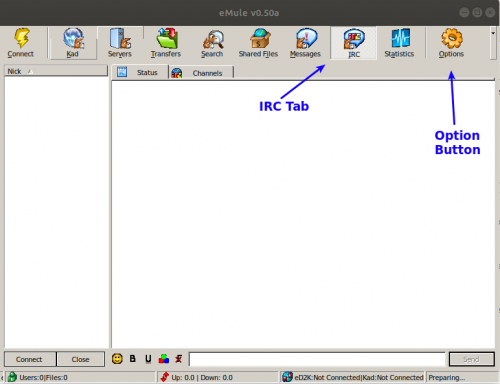
eMule needs to be configured to connect to the bouncer, so to do this we need to select the "IRC" tab firstly and then click on "Options"
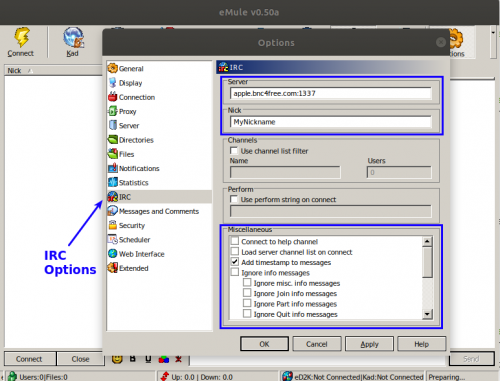
eMule will then bring up an options window. Within this window you need to select "IRC" on the left. You should be presented with the options shown below
The options in this windows then need configured/changed as follows:
| Option | Description | Value / Recommended Value |
|---|---|---|
| Server | The server that your account has been added to (i.e apple.bnc4free.com) including the port number 1337
Note: The SSL port does not currently work with eMule |
<server>.bnc4free.com:1337 |
| Nick | Your nickname (The bouncer should keep and set this anyway) | MyNickname |
| Connect to help channel | This doesn't serve a purpose unless your bouncer is connected to the official eMule IRC network.
If you are connected to eMule's IRC network, you may optionally check this to ensure your bouncer always joins the help channel |
Not Checked |
| Load server channel list on connect | This option will create a tab containing the channel list for the network your bouncer is connected to.
If you would like to see this every time you connect, check this box. |
Not Checked |
| Add timestamp to messages | This adds the timestamp at the start of each message you recieve.
You'll probably want to check this box to keep track of messages and the times they were recieved |
Checked |
| Ignore info messages | If this is checked, you won't recieve any join, part, quit messages and other info messages in any of the channels you are in
If this is unchecked you will recieve join, part, quit messages and other info messages in all channels you are in |
Not Checked |
| Ignore misc. info messages | If this is checked, you won't recieve any info messages in any of the channels you are in
If this is unchecked you will recieve info messages in all channels you are in |
Not Checked |
| Ignore Join info messages | If this is checked, you won't recieve any join messages in any of the channels you are in
If this is unchecked you will recieve join messages in all channels you are in |
Not Checked |
| Ignore Part info messages | If this is checked, you won't recieve any part messages in any of the channels you are in
If this is unchecked you will recieve part messages in all channels you are in |
Not Checked |
| Ignore Quit info messages | If this is checked, you won't recieve any quit messages in any of the channels you are in
If this is unchecked you will recieve quit messages in all channels you are in |
Not Checked |
Once you have done this click "Apply" and "OK".
Connecting
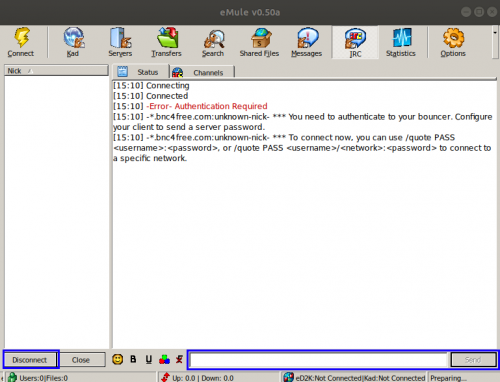
On the "IRC" tab on the main window, You should now be able to press "Connect" in the bottom left corner. Your window should now look like this:
In the text box, you need to send your username and password to authenticate to the bouncer. To do this issue the following command
/pass <username>:<password>
Alternatively if you wish to attach to a specific network on your account, use the following command:
/pass <username>/<network name>:<password>
Once you have entered this, press the send button and you should now be authenticated to your bouncer and joined to your channels!


