Difference between revisions of "Connect:mIRC"
m (Add notes about older versions of mIRC) |
m (A bit more information on SSL for MIRC) |
||
| Line 98: | Line 98: | ||
If this is the case, either update mIRC to the [https://www.mirc.com/get.html latest version] or install the [http://www.openssl.org/ Open SSL] libraries required. | If this is the case, either update mIRC to the [https://www.mirc.com/get.html latest version] or install the [http://www.openssl.org/ Open SSL] libraries required. | ||
| + | |||
| + | == Where do I install the OpenSSL library? == | ||
| + | You will need to install it either in the mIRC folder (typically C:\Program Files\mIRC or C:\Program Files (x86)\mIRC) or in the Windows System folder (typically C:\Windows\System32). | ||
| + | |||
| + | If you install it in the mIRC folder, OpenSSL will be usable only by mIRC. | ||
| + | |||
| + | If you install it in the Windows System folder, OpenSSL will be usable by all applications. | ||
| + | |||
| + | After installing OpenSSL restart or start mIRC. It should use the OpenSSL library automatically. To confirm whether mIRC has loaded the OpenSSL library, you can open the Options dialog and look in the Connect/Options section to see if the "SSL" button is enabled. You can also confirm if SSL is enabled by running the following: | ||
| + | |||
| + | //echo -a $sslready | ||
| + | |||
| + | Please note that SSL ports whether in a <code>/server</code> command or in the server list '''must''' be prefixed with a '+'. (e.g +1339 and not 1339) | ||
Revision as of 20:38, 27 November 2020
Connecting with mIRC
This guide will tell you how to connect to our bouncers using the mIRC Client which is available at https://www.mirc.com/get.html.
For the purposes of this guide, we have used mIRC v7.61
Please see notes regarding SSL here
Configuration
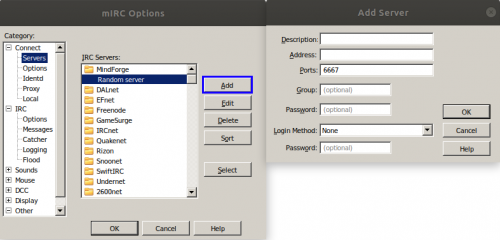
mIRC needs to be configured to connect to our bouncer, so to do this we need to bring up the "Server List". If this hasn't appeared automatically when starting mIRC, navigate to "File -> Select Server...". You should be presented with a window, on this window press the "Add" button and you should see something like this:
The options in this window need to be configured/changed as follows:
| Option | Description | Value / Recommended Value |
|---|---|---|
| Description | The name of the server that will be added (Can be anything) | MyBouncer |
| Address | The server that your account has been added to (i.e apple.bnc4free.com) | <server>.bnc4free.com |
| Ports | Port 1337 for Non-SSL / Port +1339 for SSL (Don't forget the '+') | +1339 |
| Group | The name of the server that will be added (Can be anything).
Note: By setting this, you will be able to use "/server [ChosenName]" to connect |
Bouncers |
| Password | This must be the username and password you use to authenticate to the bouncer
OR This must be the username, password and network name you use to authenticate to the bouncer |
MyUsername:MyPassword
OR MyUsername/Network:MyPassword |
| Login Method | This is the login method mIRC will use to authenticate to the bouncer.
Selecting 'None' is sufficient enough to send PASS to authenticate to the bouncer |
None |
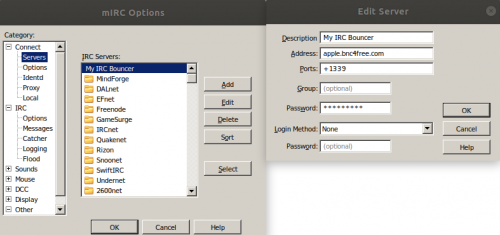
Once completed, the window should look like this:
Press "OK" on the "Add Server" window and "OK" on the server list (mIRC Options) window.
Connecting
If you have added the bouncer to the Server List as outlined in the steps above, assuming that you have set a group a name, you will be able to connect using the following command:
/server [GroupName]
Replacing [GroupName] with the Group name you set up in the steps above
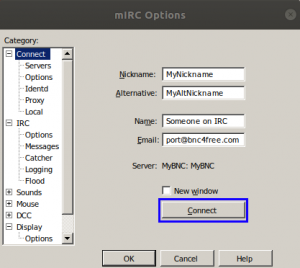
Alternatively you can navigate to "File -> Select Server..." and double click the network you have added. This should bring up a window as shown below:
Press "Connect" on this window to connect to the bouncer.
You can also manually connect to your bouncer should you need to by using one of the following commands in mIRC's server window.
/server <server>:<port> <username>:<password>
or
/server <server>:<port> <username>/<network name>:<password>
Examples of this are shown below:
/server apple.bnc4free.com:+1339 TestOne:foo
or
/server apple.bnc4free.com:+1339 TestOne/Freenode:foo
Notes Regarding SSL
Older versions of mIRC did not support SSL natively and therefore require you to have the Open SSL libraries installed in order for it work. You will know if your version of mIRC does not support SSL if you recieve the following message while connecting to an SSL Port.
[12:34:56] SSL Error: SSL not available
If this is the case, either update mIRC to the latest version or install the Open SSL libraries required.
Where do I install the OpenSSL library?
You will need to install it either in the mIRC folder (typically C:\Program Files\mIRC or C:\Program Files (x86)\mIRC) or in the Windows System folder (typically C:\Windows\System32).
If you install it in the mIRC folder, OpenSSL will be usable only by mIRC.
If you install it in the Windows System folder, OpenSSL will be usable by all applications.
After installing OpenSSL restart or start mIRC. It should use the OpenSSL library automatically. To confirm whether mIRC has loaded the OpenSSL library, you can open the Options dialog and look in the Connect/Options section to see if the "SSL" button is enabled. You can also confirm if SSL is enabled by running the following:
//echo -a $sslready
Please note that SSL ports whether in a /server command or in the server list must be prefixed with a '+'. (e.g +1339 and not 1339)


