Difference between revisions of "Connect:Konversation"
(Guide to connecting with Konversation) |
m (→Connecting: Fix password showing twice) |
||
| Line 87: | Line 87: | ||
| Your nickname (The bouncer will set this itself so can be left blank) | | Your nickname (The bouncer will set this itself so can be left blank) | ||
| YourNickname | | YourNickname | ||
| − | |||
| − | |||
| − | |||
| − | |||
|- | |- | ||
| Password | | Password | ||
Latest revision as of 20:46, 27 April 2020
Connecting with Konversation
This guide will tell you how to connect to our bouncers using the Konversation IRC Client which is available at https://konversation.kde.org/.
For the purposes of this guide, we have used Konversation v1.7.4
Configuration
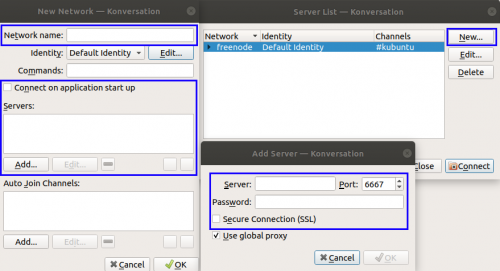
Konversation needs to be configured to connect to our bouncer, so to do this we need to bring up the "Server List". If this hasn't appeared automatically when starting mIRC, navigate to "File -> Server List". You should be presented with a window, on this window press the "New" button and you should see something like this:
The options in this window need to be configured/changed as follows:
| Option | Description | Value / Recommended Value |
|---|---|---|
| Network Name | The name of the server that will be added (Can be anything) | MyBouncer |
| Connect on application startup | If checked, the client will automatically connect to the bouncer when the client is started | Checked |
| Server | After pressing "Add" under Servers, this option appears. This should be the server that your account has been added to (i.e apple.bnc4free.com) | <server>.bnc4free.com |
| Port | After pressing "Add" under Servers, this option appears. This should be Port 1337 for Non-SSL / Port 1339 for SSL | 1339 |
| Password | This must be the username and password you use to authenticate to the bouncer
OR This must be the username, password and network name you use to authenticate to the bouncer |
MyUsername:MyPassword
OR MyUsername/Network:MyPassword |
| Secure Connection (SSL) | If this box is checked, SSL will be used for the connection (Port 1339 Only) | Checked |
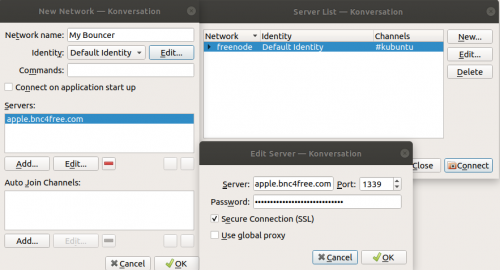
Once completed, the window should look like this:
Press "OK" on the "Add Server" window and "OK" on the "New Network" window.
Connecting
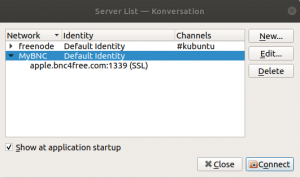
If you have added the bouncer to the Server List as outlined in the steps above, you will be able to connect to your bouncer from the Server List. If this hasn't shown up automatically when launching the client, use "File -> Server List", you should see a window similar to the below:
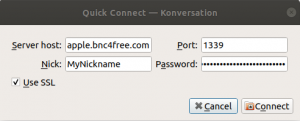
Alternatively you can use "Quick Connect" to connect to the bouncer by selecting "File -> Quick Connect" with the following options:
| Option | Description | Value / Recommended Value |
|---|---|---|
| Server host | This should be the server that your account has been added to (i.e apple.bnc4free.com) | <server>.bnc4free.com |
| Port | This should be Port 1337 for Non-SSL / Port 1339 for SSL | 1339 |
| Nick | Your nickname (The bouncer will set this itself so can be left blank) | YourNickname |
| Password | This must be the username and password you use to authenticate to the bouncer
OR This must be the username, password and network name you use to authenticate to the bouncer |
MyUsername:MyPassword
OR MyUsername/Network:MyPassword |
| Use SSL | If this box is checked, SSL will be used for the connection (Port 1339 Only) | Checked |
The completed window should look a bit like this:
Press "Connect" on this window to connect to the bouncer.


